How to Cope Cut Molding
The how and why of cope cutting your baseboard trim
(function(d){
var f = d.getElementsByTagName(‘SCRIPT’)[0], p = d.createElement(‘SCRIPT’);
p.type = ‘text/javascript’;
p.async = true;
p.src = ‘//assets.pinterest.com/js/pinit.js’;
p.setAttribute(‘data-pin-hover’, true);
f.parentNode.insertBefore(p, f);
}(document));
function openWin() {
myWindow = window.open(“http://www.youtube.com/channel/UCHGLUxlObWaCOcDTYiuZFPA?sub_confirmation=1”, “0, 0”, “width=575, height=325”); // Opens a new window
AnalyticsTrackEvent(‘Social’, ‘Subscribe’, ‘YouTube’);
}
If you’re adding new baseboard trim around a room, you may run into issues like corners not being a perfect 90-degrees. Which means, making 45-degree cuts with your miter saw isn’t going to work as well as you thought! So, if your room’s corners aren’t perfectly square, what’s the solution? Cope cuts! In this article, we’ll explain what a cope cut is, why it’s beneficial to your project, and how to make these cuts. It’s a bit slower than making miter cuts, but the effort will be worthwhile for the final result.
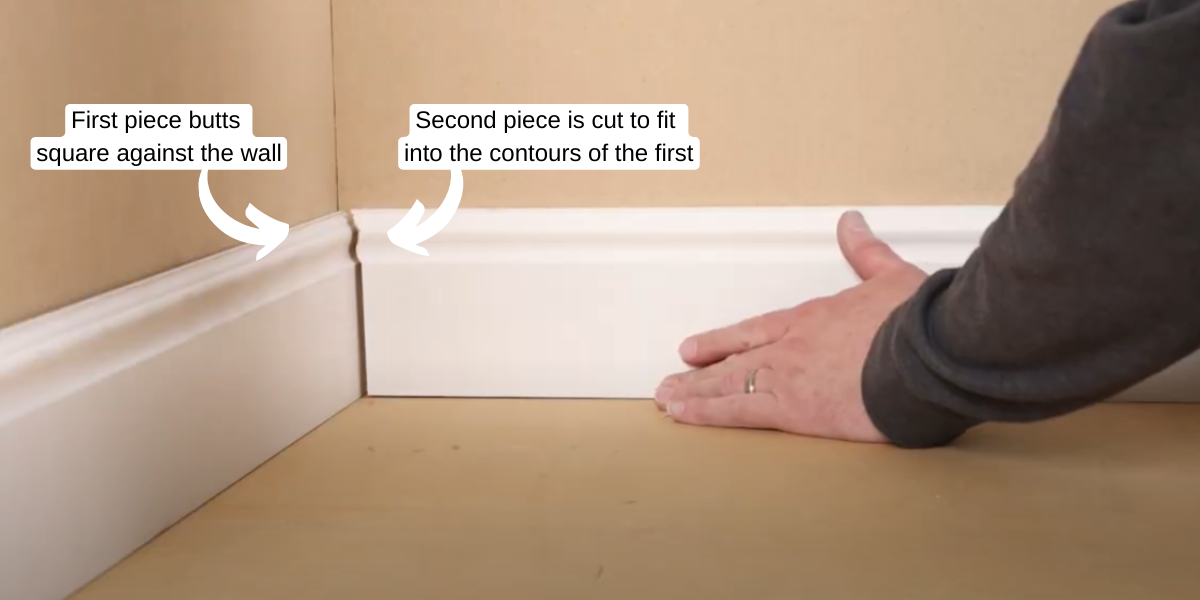
What is a Coped Joint?
When we talk about projects involving trim like baseboards or crown molding, coping is a type of method to mate your trim at an inside corner. The first piece butts square against the wall, while the second piece is cut to fit against the contours of the first piece. This is called a cope cut, or a coped joint, or coping. It is a traditional carpentry technique that is more versatile than a miter cut but requires a bit of practice to perfect.
Why Use a Cope Cut Instead of a Miter Cut?
A miter saw is a great tool to use to quickly and precisely cut your trim to 45-degree angles for corners. The issue, however, is that rooms rarely have corners at a perfect square or 90-degree angle. This means that your perfectly cut trim won’t sit flush with the wall and will have gaps. Another issue that is common when using a miter corner is fluctuations in humidity levels or temperatures. This can cause the wood to shrink or swell, which again can leave you with gaps in your corners.
A cope joint is more forgiving with non-square inner corners, and less likely to open or gap as the wood expands and contracts. The downside to using this method is that it requires more precise measurements, and hand cutting the coped end of the trim. If you’re new to carpentry or trim work, this can seem a bit intimidating and may take you longer to complete the project. If you’re on a budget (of time and/or money!) you may feel better sticking with the miter corners. However, if seeing gaps in your corner bothers you every time you look, taking the time to learn how to do the cope cuts will be worth it.
How to Plan Your Workflow
You don’t want to start cutting and nailing your trim down before you plan out your room. When doing cope cuts, you want to ensure that one end of your trim will be square, and the other end receives the cope cut. You don’t want to be left having to do a cope cut on both ends of your wood, as lining that up would be extremely difficult.
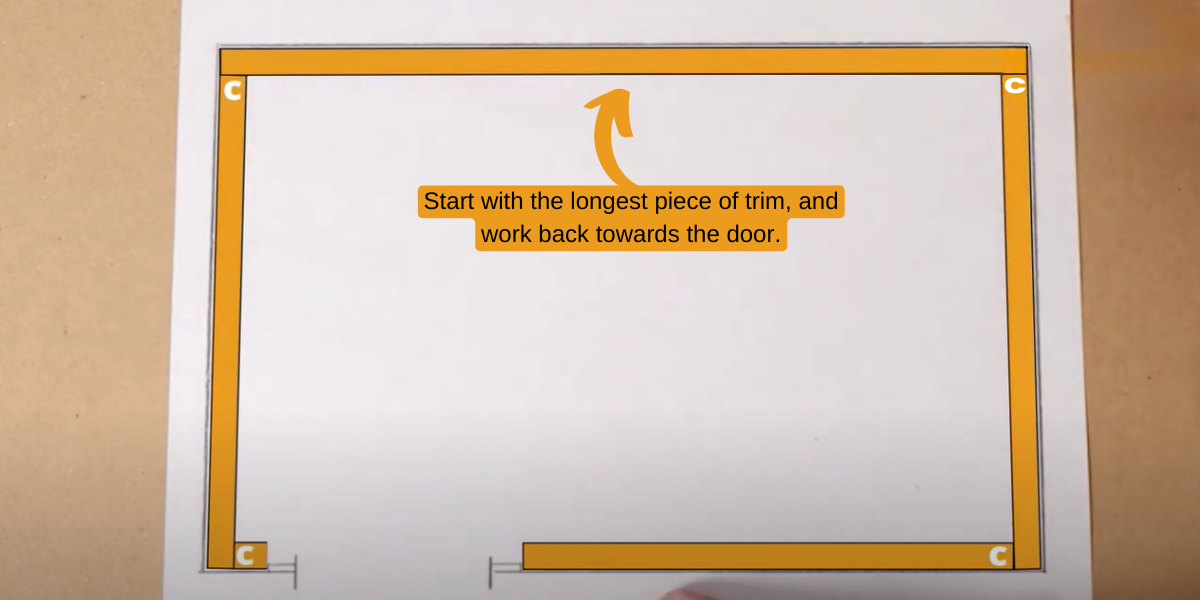
Planning out your workflow is simple, start by grabbing paper and something to write with. Draw out your room, including any doorways. Note that this drawing doesn’t need to be to scale, we’re just trying to figure out which pieces of trim get what type of cut. One way is to start from one side of the door, and work around the entire room from there – the first piece having a square cut on both ends, and the following pieces of trim alternating coped and square.
Another method is to start with your longest wall’s trim and have each end square against the wall. Then the pieces coming off here alternate with the coped and square ends. Just make sure you aren’t starting from both sides of your doorway, as that’s how you’ll end up in the situation with your longest piece of trim requiring cope cuts on both ends – that’s what we want to avoid! Drawing it out first comes before the “measure twice, cut once” principle and will save you a headache.
How to Make a Cope Cut
Now that you have your room planned out, how do you make a cope joint? You will need your miter saw, along with a cope saw, and a brad nailer to secure the trim to the wall.

- Begin by taking the first piece of trim with the square cuts at both ends and fasten it into the corner with a brad nailer.
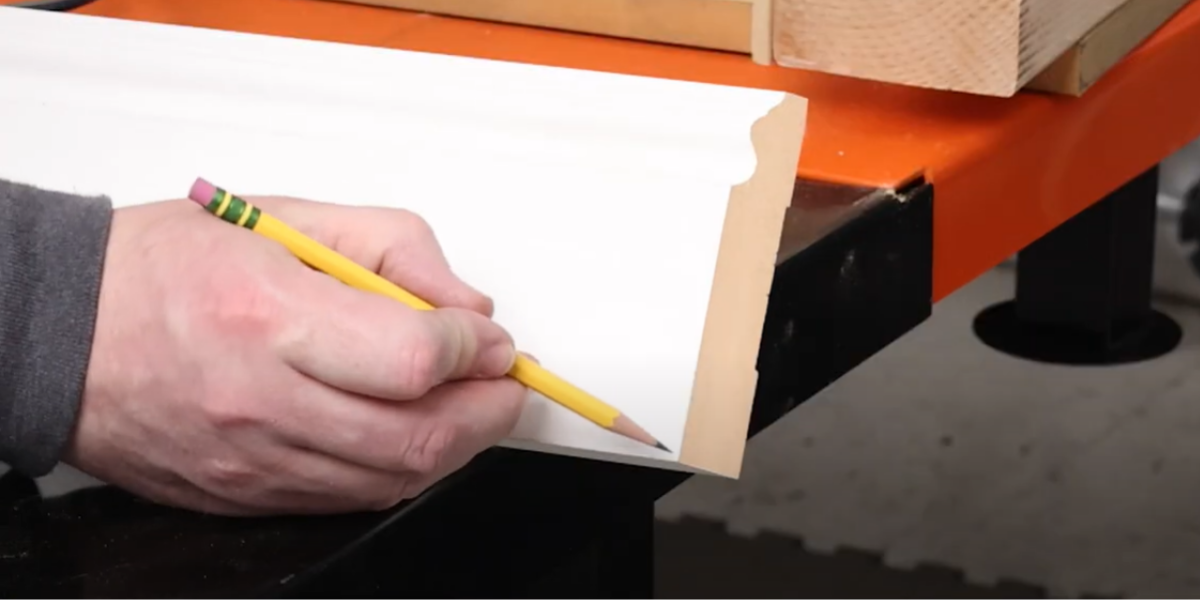
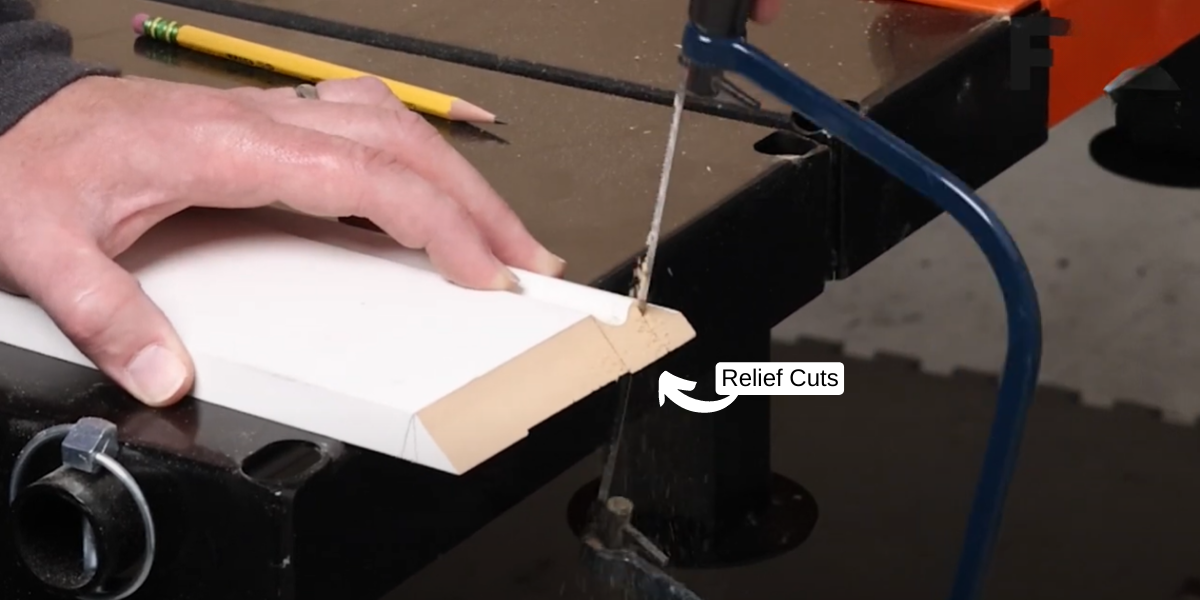
- Next, we’re going to create our first cope joint. Do this by using your miter saw to create a 45-degree bevel on the end of the trim, ensuring you’re beveling out or away from the corner. This cut gives us a line to later cut along with our cope saw.
- Before we begin cutting the cope, make a couple of “relief cuts” along some of the curves in the molding. This will make it easier to cut along those curves, as the excess wood falls away from the trim.
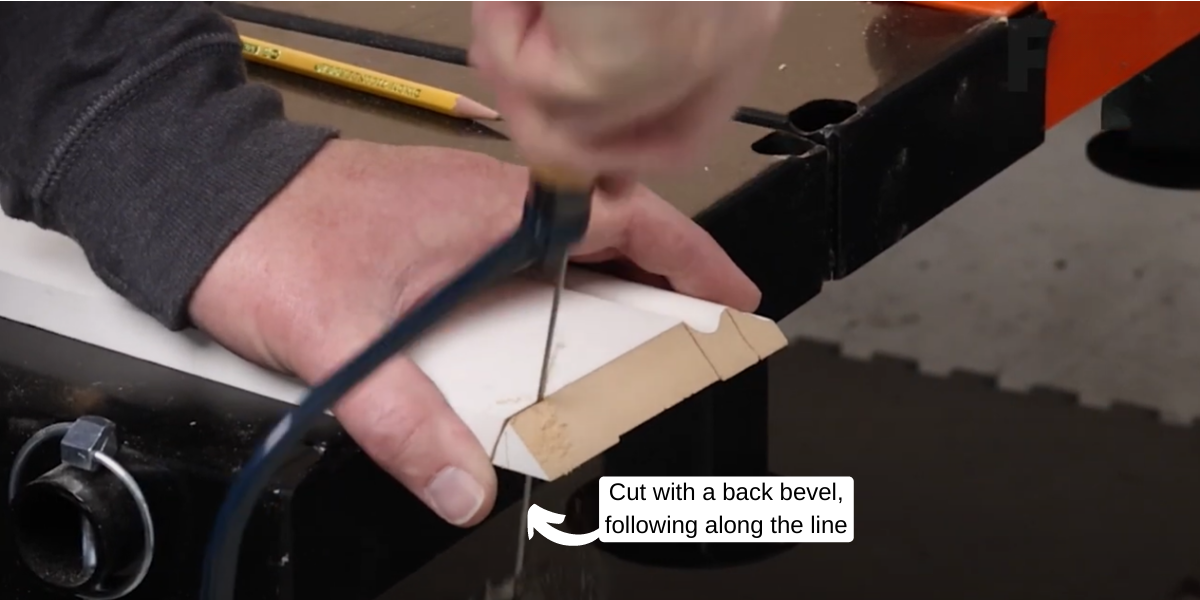
- Begin making your cope cut from the bottom of the molding. This cut isn’t made at 90-degrees, but rather at a back bevel. This gives us some flexibility since the inner corner isn’t at a perfect 90-degree square, and the back bevel lets us adjust the molding so it fits tightly against the first piece. Continue cutting this at a back bevel, following along the profile until you reach your first relief cut.
- At this point we’re going to switch to cutting from the top of the piece of trim. This time we’ll start at a 90-degree angle, and then switch to the back bevel after about one-sixteenth of an inch. This gives us a straight edge to work with when we install this piece.
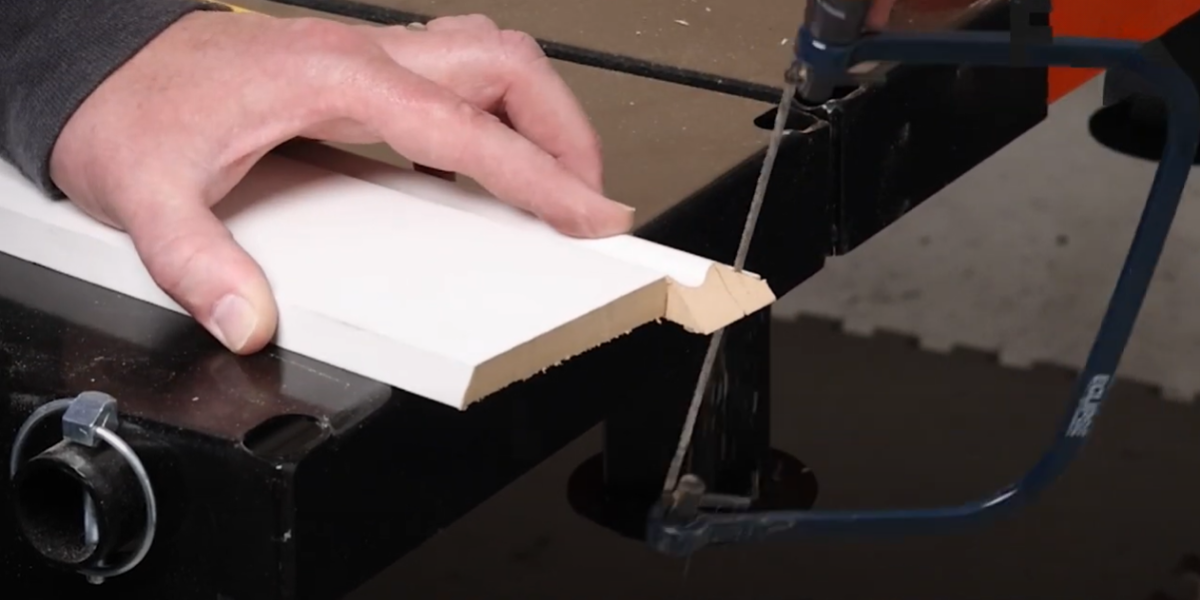
- If you’re using a stain-grade molding, you may need to clean up the piece with some sandpaper before installing. Trim that you plan to caulk and paint may not need this step.
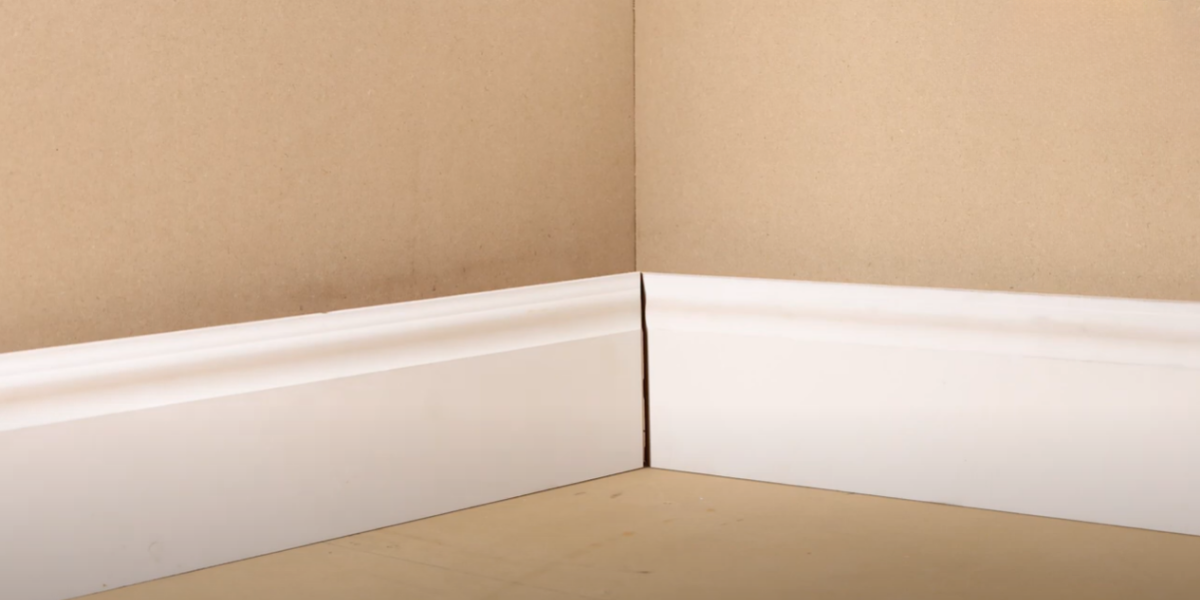
- Once you’re happy with the cut, slide it tight up against the first piece and nail it into place to complete your first cope joint!
- Repeat the above steps, working around the room until you have a completed perimeter of gap-free molding.
While coped joints take a bit more time and skill compared to miter joints, they are a true work of craftsmanship for the effort. Honing the skill on a lesser-seen piece of trim like the baseboards is a great way to practice if you decide to add something more visible like chair-rail or crown molding in the future. For more home DIY projects, be sure to follow along with us on YouTube and share your stories with us!
(function(d){
var f = d.getElementsByTagName(‘SCRIPT’)[0], p = d.createElement(‘SCRIPT’);
p.type = ‘text/javascript’;
p.async = true;
p.src = ‘//assets.pinterest.com/js/pinit.js’;
p.setAttribute(‘data-pin-hover’, true);
f.parentNode.insertBefore(p, f);
}(document));
function openWin() {
myWindow = window.open(“http://www.youtube.com/channel/UCHGLUxlObWaCOcDTYiuZFPA?sub_confirmation=1”, “0, 0”, “width=575, height=325”); // Opens a new window
AnalyticsTrackEvent(‘Social’, ‘Subscribe’, ‘YouTube’);
}